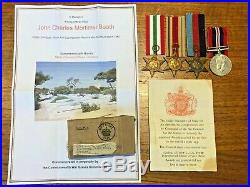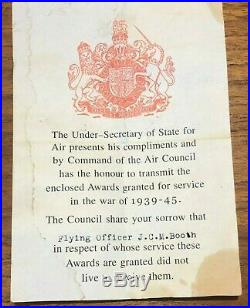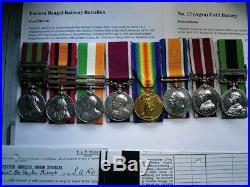
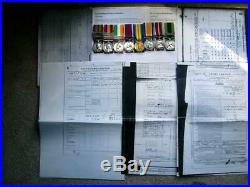
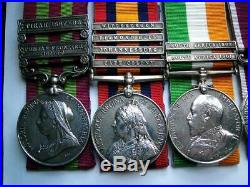
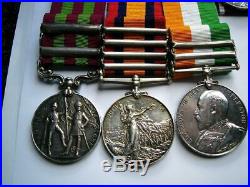
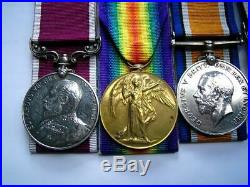
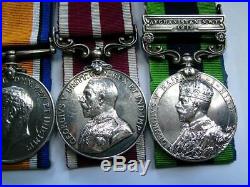
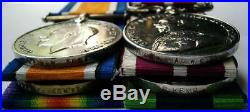
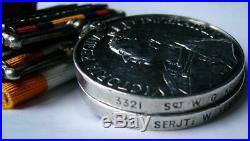
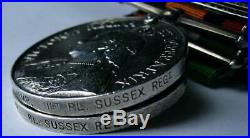
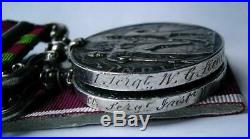
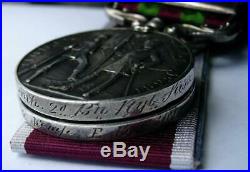

SUSSEX REGT Very fine plus. LS & GC Edward VII official named “1st CL SERGT INSTR W G KEMP E B VOLTR RFLS” , WW1 British War & Victory medals “CAPT W KEMP”, both official named, very fine plus. Meritorious Service Medal GV, ACT SGT MAJ W G J KEMP I. L very fine plus. F 1919 bar, (North Western Frontier for Afghanistan 3rd war) officially named ” CAPTN W G J KEMP 41/ MULE CORPS”, very fine plus, group of eight, mounted on card for display. Supplied with some history, copy medal roll extracts and records. Victorian India QSA KSA LSGC MSM WW1 Afghan medal Captain Kemp Sussex Rgt + S&T. William George John Kemp was born in Ticehurst, Sussex, on 26 March 1871 and attested for the Royal Sussex Regiment at Chichester on 14 November 1889, having previously served in the Regiments 3rd (Militia) Battalion. Posted to the 1st Battalion, he was advanced Lance Sergeant on 19 November 1894, before transferring to the 2nd Battalion, for service in India, on 14 February 1896. He served in India from that date, and was promoted Sergeant on 4 April 1896, subsequently seeing active service on the Punjab Frontier during the Tirah campaign. Returning home on 7 October 1898, Kemp reverted to the 1st Battalion on that date, and served with them in Malta and then in South Africa during the Boer War from 19 February 1900 to 16 October 1902. He was promoted Colour Sergeant on 20 September 1902, before transferring to the Unattached List for employment as 2nd Class Sergeant Instructor of the Agra Volunteer Rifles. Kemp was awarded his Long Service and Good Conduct Medal on 14 November 1907, whilst serving as 1st Class Sergeant Instructor of the Eastern Bengal Volunteer Rifles, and was discharged in the rank of Acting Sergeant Major on 27 April 1912, after 22 years and 166 days service. Following the outbreak of the Great War Kemp was commissioned Second Lieutenant in the Indian Army Reserve of Officers on 18 October 1916, and served during the Great War as Commandant of the 27th Mule Corps, Supply and Transport Corps, Indian Army from 6 January to 21 November 1917, and then as Commandant of the 41st Mule Corps from 22 November 1917. Advanced Acting Captain on 1 October 1918, he saw active service on the North West Frontier during the Third Afghan War, before being released from Military Services on 2 May 1921. INDIA PUNJAB & TIRAH 1897-98. Rebellion Punjab Frontier 1897-98. The Afridi tribe had received a subsidy from the government of British India for the safeguarding of the Khyber Pass for sixteen years; in addition to which the government had maintained for this purpose a local regiment entirely composed of Afridis, who were stationed in the pass. Suddenly, however, the tribesmen rose, captured all the posts in the Khyber held by their own countrymen, and attacked the forts on the Samana Range near the city of Peshawar. The Battle of Saragarhi occurred at this stage. It was estimated that the Afridis and Orakzais could, if united, bring from 40,000 to 50,000 men into the field. The preparations for the expedition occupied some time, and meanwhile British authorities first dealt with the Mohmand rising northwest of the Khyber Pass. The general commanding was General Sir William Lockhart commanding the Punjab Army Corps; he had under him 34,882 men, British and Indian, in addition to 20,000 followers. The frontier post of Kohat was selected as the base of the campaign, and it was decided to advance along a single line. On 18 October, the operations commenced, fighting ensuing immediately. The Dargai heights, which commanded the line of advance, were captured without difficulty, but abandoned owing to the want of water. On 20 October the same positions were stormed, with a loss of 199 of the British force killed and wounded. The progress of the expedition, along a difficult track through the mountains, was obstinately contested on 29 October at the Sampagha Pass leading to the Mastura valley, and on 31 October at the Arhanga Pass from the Mastura to the Tirah valley. The force, in detached brigades, now traversed the Tirah district in all directions, and destroyed the walled and fortified hamlets of the Afridis. The two divisions available for this duty numbered about 20,000 men. A force about 3,200 strong commanded by Brigadier-General (afterwards Major General Sir Richard) Westmacott was first employed to attack Saran Sar, which was easily carried, but during the retirement the troops were hard pressed and had 64 casualties. On 11 November, Saran Sar was again attacked by the brigade of Brigadier-General (afterwards Sir Alfred) Gaselee. Experience enabled better dispositions to be made, and the casualties were only three. The traversing of the valley continued, and on 13 November a third brigade under Brigadier General Francis James Kempster visited the Waran valley via the Tseri Kandao Pass. Little difficulty was experienced during the advance, and several villages were destroyed; but on 16 November, during the return march, the rearguard was hotly engaged all day, and had to be relieved by fresh troops next morning. British casualties numbered 72. On 21 November, a brigade under Brigadier-General Westmacott was detached to visit the Rajgul valley. The road was exceedingly difficult and steady opposition was encountered. The objectives were accomplished, but with 23 casualties during the retirement alone. The last task undertaken was the punishment of the Chamkannis, Mamuzais, and Massozais. This was carried out by Brigadier-General Gaselee, who joined hands with the Kurram movable column ordered up for the purpose. The Mamuzais and Massozais submitted immediately, but the Chamkannis offered resistance on 1 and 2 December, with about 30 British casualties. 1899 to return via the Mastura valley, destroying the forts on the way, and to join at Bara, within easy march of Peshawar; the second division under Major General Yeatman Biggs d. 1898, and, accompanied by Lockhart, to move along the Bara valley. The base was thus to be transferred from Kohat to Peshawar. The return march began on 9 December. The cold was intense, 21 degrees of frost being registered before leaving Tirah. The movement of the first division though arduous was practically unopposed, but the 40 miles to be covered by the second division were contested almost throughout. The march down the Bara valley (34 miles) commenced on 10 December, and involved four days of the hardest fighting and marching of the campaign. The road crossed and recrossed the icy stream, while snow, sleet and rain fell constantly. On the 10th, the casualties numbered about twenty. On the 11th, some fifty or sixty casualties were recorded among the troops, but many followers were killed or died of exposure, and quantities of stores were lost. On the 12th, the column halted for rest. On the 13th, the march was resumed in improved weather, though the cold was still severe. The rearguard was heavily engaged, and the casualties numbered about sixty. On the 14th, after further fighting, a junction with the Peshawar column was effected. The first division, aided by the Peshawar column, now took possession of the Khyber forts without opposition. Negotiations for peace were then begun with the Afridis, who under the threat of another expedition into Tirah in the spring at length agreed to pay the fines and to surrender the rifles demanded. The expeditionary force was broken up on 4 April 1898. A memorable feature of this campaign was the presence in the fighting line of the Imperial Service native troops under their own officers, while several of the best known of the Indian princes served on Lockhart’s staff. Fourteen thousand British soldiers squared up against four thousand Boers and forced them from their positions on the hill. The British cavalry were under the command of Sir Ian Hamilton. He despatched Robert Broadwood’s 2nd Cavalry brigade, which included the 10th Royal Hussars, 12th Royal Lancers and the Household Cavalry Regiment, on a Special Mission. As the sun came up it was a bitterly cold Monday morning… We are hidden in the hills at Donkerhoek… Confided Botha to his diary. As a detachment of 10th Hussars swung off to the right, they were attacked from Diamond Hill. A section of Q Battery RHA attempted to return artillery fire, but had no infantry support, until the 12th Lancers arrived on the front line. The Boers pressed the matter hard. Two squadrons of Household Cavalry Regiment and one squadron of the 12th Hussars charged at full gallop at Boers firing from concealed positions. On 13th the Botha’s army retreated to the north, they were chased as far as Elands River Station, only 25 miles from Pretoria, by Mounted Infantry and De Lisle’s Australians. Forty-four years after the battle, British General Ian Hamilton opined in his memoirs that “the battle, which ensured that the Boers could not recapture Pretoria, was the turning point of the war”. Hamilton credited Winston Churchill with recognizing that the key to victory would be in storming the summit, and risking his life to signal Hamilton. A clasp inscribed “Johannesburg” will be granted to all troops who, on May 29. 1900, were north of an east and west line through Klip River Station (exclusive), and east of a north and south line through Krugersdorp Station (inclusive). Rapid growth, Jameson Raid and the Second Boer War , Johannesburg. As the value of control of the land increased, tensions developed between the Boer. Government in Pretoria and the British, culminating in the Jameson Raid. That ended in fiasco at Doornkop. In January 1896 and the Second Boer War. (18991902) that saw British forces under Field Marshal Frederick Sleigh Roberts, 1st Earl Roberts, occupy the city on 30 May 1900 after a series of battles to the south-west of its then-limits, near present-day Krugersdorp. Fighting took place at the Gatsrand Pass (near Zakariyya Park) on 27 May, north of Vanwyksrust today’s Nancefield, Eldorado Park and Naturena the next day, culminating in a mass infantry attack on what is now the waterworks ridge in Chiawelo and Senaoane on 29 May. During the war, many African mineworkers left Johannesburg creating a labour shortage, which the mines ameliorated by bringing in labourers from China, especially southern China. After the war, they were replaced by black workers, but many Chinese stayed on, creating Johannesburg’s Chinese community, which during the apartheid era, was not legally classified as “Asian”, but as “Coloured”. The population in 1904 was 155,642, of whom 83,363 were whites. A clasp inscribed “Wittebergen” will be granted to all troops who were inside a line drawn from Harrismith to Bethlehem, thence to Senekal and Clocolan, along the Basuto border, and back to Harrismith, between July 1st and 29th, 1900, both dates inclusive. Cape Colony (State Clasp). A clasp inscribed “Cape Colony” will be granted to all troops in Cape Colony at any time between October 11th, 1899, and a date to be hereafter fixed, who received no clasp for an action already specified in the Cape Colony nor Natal clasps. Fighting in India WW1. Before World War I, the Indian Army was deployed maintaining internal security and defending the North West Frontier against incursions from Afghanistan. These tasks did not end with the declaration of war. The divisions deployed along the frontier were the existing 1st (Peshawar) Division, the 2nd (Rawalpindi) Division, the 4th (Quetta) Division. The only war-formed division to serve in India was the 16th Indian Division formed in 1916, it was also stationed on the North West Frontier. All these divisions were still in place and took part in the Third Afghan War at the end of World War I. In supporting the war effort, India was left vulnerable to hostile action from Afghanistan. A Turco-German mission arrived in Kabul in October 1915, with obvious strategic purpose. Habibullah Khan abided by his treaty obligations and maintained Afghanistan’s neutrality, in the face of internal opposition from factions keen to side with the Ottoman Sultan. Despite this, localised actions along the frontier still took place and included Operations in the Tochi (191415), Operations against the Mohmands, Bunerwals and Swatis (1915), Kalat Operations (191516), Mohmand Blockade (191617), Operations against the Mahsuds (1917) and Operations against the Marri and Khetran tribes (1918). On the North East Frontier between India and Burma punitive actions were carried out against the Kachins tribes between December 1914 February 1915, by the Burma Military Police supported by the 1/7th Gurkha Rifles and the 64th Pioneers. [28] Between November 1917 March 1919, operations were carried out against the Kuki tribes by auxiliary units of the Assam Rifles and the Burma Military Police (BMP). The other divisions remaining in India at first on internal security and then as training divisions were the 5th (Mhow) Division, the 8th (Lucknow) Division and the 9th (Secunderabad) Division. Over the course of the war these divisions lost brigades to other formations on active service; The 5th (Mhow) Division lost the 5th (Mhow) Cavalry Brigade to the 2nd Indian Cavalry Division. The 8th (Lucknow) Division lost the 8th (Lucknow) Cavalry Brigade to the 1st Indian Cavalry Division and the 22nd (Lucknow) Brigade to the 11th Indian Division. The 9th (Secunderabad) Division lost the 9th (Secunderabad) Cavalry Brigade to the 2nd Indian Cavalry Division and the 27th (Bangalore) Brigade which was sent to British East Africa. 3rd Anglo-Afghan war NWF India 1919. British Field Artillery pieces North West Frontier – Afghanistan/India The Third Anglo-Afghan War of 1919 was the War for Afghanistan Independence, began on 6 May 1919 when the Emirate of Afghanistan invaded British India and ended with an armistice on 8 August 1919. The war resulted in the Afghans winning back control of foreign affairs from Britain, and the British recognizing Afghanistan as an independent nation. It was also a minor strategic victory for the British because the Durand Line was reaffirmed as the border between Afghanistan and the British Raj, and the Afghans agreed not to foment trouble on the British side. Although, Afghans who were on the British side of the border did cause concerns due to revolts for many years to come. While ostensibly the country remained independent, under the Treaty of Gandumak (1879) it accepted that in external matters it would… Have no windows looking on the outside world, except towards India. Indian Army troops NW Frontier Afghanistan The death in 1901 of Emir Abdur Rahman Khan led indirectly to the war that began 18 years later. His successor, Habibullah, was a pragmatic leader who sided with Britain or Russia, depending on Afghan interests. Despite considerable resentment over not being consulted over the Anglo-Russian Convention of 1907 Convention of St. Petersburg, Afghanistan remained neutral during the First World War (191418), resisting considerable pressure from the Ottoman Empire when it entered the conflict on the side of Imperial Germany and the Sultan (as titular leader of Islam) called for a holy war against the Allies. Despite remaining neutral in the conflict, Habibullah did in fact accept a Turkish-German mission in Kabul and military assistance from the Central Powers as he attempted to play both sides of the conflict for the best deal. Through continual prevarication, he resisted numerous requests for assistance from the Central Powers, but failed to keep in check troublesome tribal leaders, intent on undermining British rule in India, as Turkish agents attempted to foment trouble along the frontier. The departure of a large part of the British Indian Army to fight overseas and news of British defeats at the hands of the Turks aided Turkish agents in efforts at sedition, and in 1915 there was unrest amongst the Mohmands and then the Mahsuds. Not withstanding these outbreaks, the frontier generally remained settled at a time when Britain could ill afford trouble. NW Frontier 1919 After the suspicious death of Habibullah the ruler of Afghanistan early 1919, Amanullah his son upon seizing the throne in April 1919, posed as a man of democratic ideals, promising reforms in the system of government. He stated that there should be no forced labour, tyranny or oppression, and that Afghanistan should be free and independent and no longer bound by the Treaty of Gandumak of 1879 (Peace treaty with the British). Amanullah had his uncle Nasrullah arrested for Habibullah’s murder and had him sentenced to life imprisonment. Nasrullah had been the leader of a more conservative element in Afghanistan and his treatment rendered Amanullah’s position as Amir somewhat tenuous. By April 1919 he realised that if he could not find a way to placate the conservatives, he would be unlikely to maintain his hold on power. Looking for a diversion from the internal strife in the Afghan court and sensing advantage in the rising civil unrest in India following the Amritsar massacre, Amanullah decided to invade British India. RAF Afghanistan 1919 Casualties during the conflict amounted to approximately 1,000 Afghans killed in action, while the British and Indian forces lost 236 killed in action. In addition, 615 were wounded, 566 died from cholera, and 334 died as a result of other diseases and accidents. Regardless of casualties, the outcome of the Third Anglo-Afghan War remains contentious. Ostensibly, the result of the conflict was a British tactical victory. This is by virtue of the fact that the British repulsed the Afghan invasion and drove them from Indian territory, while Afghan cities were subjected to attack by Royal Air Force bombers. Nevertheless, the Afghans were ultimately able to secure their strategic political goals in the aftermath of the conflict. Thus the extent of the British tactical victory was limited, and the Afghans also made strategic gains. Tailor your auctions with Auctiva’s. Track Page Views With. Auctiva’s FREE Counter. The item “Victorian India QSA KSA LSGC MSM WW1 Afghan medal Captain Kemp Sussex Rgt + S&T” is in sale since Monday, June 1, 2020. This item is in the category “Collectables\Militaria\Boer War (1899-1902)”. The seller is “theonlineauctionsale” and is located in Offchurch. This item can be shipped worldwide.
- Country/Region of Manufacture: United Kingdom
- Country/ Organization: Great Britain
- Issued/ Not-Issued: Issued
- Type: Medals & Ribbons
- Conflict: India, Boer War, World War I, 3rd Afghan War
- Service: Army
- Era: 1816-1913
